

Want to schedule Instagram Stories from your laptop and upload stories easily? ou can, even though the platform was designed for mobile-only sharing. This guide outlines four simple and effective workarounds to help you schedule your Instagram Story in no time.
More and more people and brands are using Instagram Stories every day. In fact, there are now over 500 million active daily users for Instagram Stories.
But, just as with normal Instagram posts initially, Stories were designed to be shared only from your mobile device … and only at the moment you wanted to share. Essentially, that means no scheduling. (I know, what a bummer, right?)
However, the good news is that there are four ways for people and brands can schedule Instagram Stories from their desktop… a clever little workaround that’s quite easy to use and that will accomplish exactly what you’re looking for.
Whether you manage a personal Instagram account or a brand account, these desktop workarounds will help you post Stories more efficiently.
Why Use Instagram Stories?
So if you aren’t already using Instagram Stories, turns out, there are some pretty compelling business reasons to post on Instagram stories…
- Instagram has 2 billion monthly active users. That’s 2 billion – with a’B’.
- Instagram is the preferred platform for social media users between the age of 16-34.
- 70% of shoppers look to Instagram for their next purchase
While Instagram feed posts appear permanently on your profile, Stories are temporary but highly engaging content that appears at the top of your followers’ feeds, making them a great way to catch immediate attention.
Convinced yet?
Okay, good.
Now, let’s talk about how you can schedule all those Instagram Stories from your desktop.

Publish And Schedule Instagram Story Content: 4 Proven Workarounds
Because the Instagram platform is designed to be used via a mobile device, there’s no option within Instagram to post a Story directly from the desktop app. Below are four proven work-arounds that let you create or schedule Stories on a laptop. If you’re looking to post Instagram from a PC without constantly switching to your phone, the following methods will help you schedule and publish Stories seamlessly.
(Note: Agorapulse can significantly streamline this process, particularly for Instagram. You can schedule Instagram posts and stories directly, as well as track key metrics, and even respond to your Instagram DM’s and comments.)
Try Agorapulse for FREE and take control of your Instagram marketing!
1. Use a social-media scheduler (e.g., Agorapulse)
Using a third-party social media scheduler is the most comprehensive way to automatically schedule your Instagram Stories and feed posts from the same dashboard, streamlining your workflow.
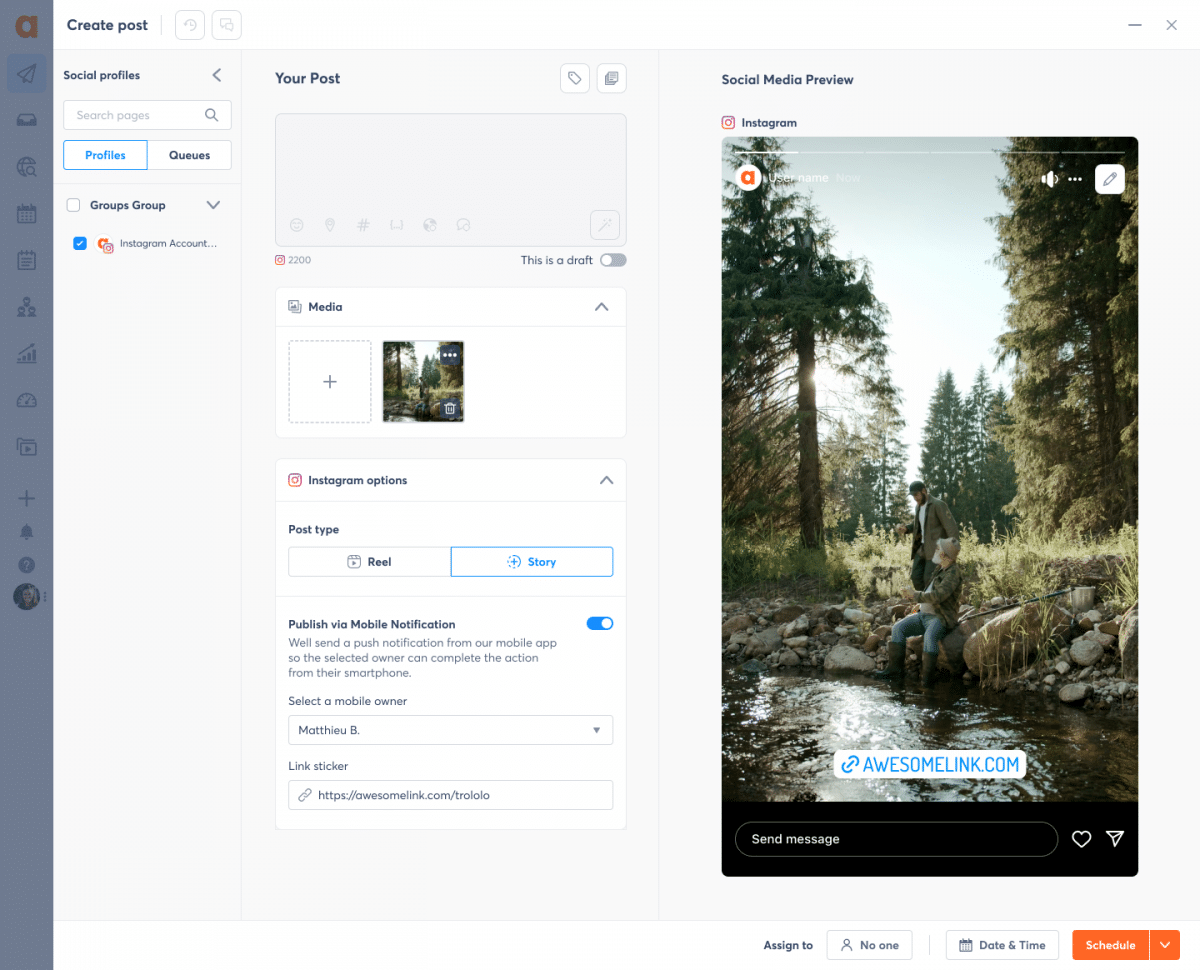
The scheduling process (using Agorapulse as an example)
Let’s go through a quick example to show you how it works with Agorapulse.
- Create a graphic
Use a design tool like Canva on your computer to create a 1080px by 1920px graphic. (Or you can also do this within the Agorapulse publishing window in the next step). - Open Agorapulse
Log in to Agorapulse and go to the publishing window to create a new Instagram post. Upload photos, and then select the type of Instagram post you want to make So, in this case, we are going to choose Story.
Example of Instagram Stories from the desktop
- Choose the time/date
Decide when you want the Story to go live. You can choose to post it now or set a specific date and time in the future. - Auto publish or mobile notification
Auto Publish (Default): The Story will publish automatically at the scheduled time. This is the most hands-off option.
Mobile Notification: You receive a push notification on your phone at the chosen time. You would choose this option if you need to add other native Instagram features (e.g., link stickers, polls, music). Agorapulse will send the image to the Instagram app for final editing before you manually publish.

- Publish to Instagram
If you have the Story set to publish automatically, then guess what – you are already done! If you chose to receive the mobile notification instead, just tap the notification, and Agorapulse will send your image to the Instagram app. Choose to add it to your Story. You can then edit it further in Instagram if you want before publishing. Don’t forget: If you have more than one Instagram profile, make sure that you’re logged into the correct one before tapping on “Copy to Instagram.”

With tools like Agorapulse, you can not only schedule your Instagram Stories but also schedule feed posts from the same dashboard, streamlining your social media workflow.
2. Inspect-Element (Browser “Mobile View”) Method
One of the easiest ways to post a Story from a computer is to trick Instagram’s website into thinking your desktop browser is a phone. Every major browser has a hidden “device toolbar” inside its developer tools that changes the page layout to a mobile size.
Once that view is active, Instagram shows the same Story button you see inside the iOS or Android app.
Because the page is still the web version, only core features load: you can add a single photo or post videos up to fifteen seconds long, type simple text, and press publish. Interactive extras like music, polls, GIFs and link stickers stay locked, and you cannot save drafts or schedule ahead. Still, for one-off content that is already sitting on your hard drive, this approach saves time and costs nothing.
Features and limitations
- Allows: Adding a single photo or video (up to 15 seconds) and simple text.
- Does NOT Allow: Interactive extras (music, polls, GIFs, link stickers), saving drafts, or scheduling ahead.
How to post a Story via the Browser Inspect Element
-
Open Instagram.com and sign in.
-
Press Ctrl + Shift + I on Windows or ⌥ ⌘ I on a Mac to open Developer Tools.
-
Click the small phone-tablet icon in the top-left of the panel.
-
Refresh the page.
-
Click the “+” beside your avatar, choose Story, select your file, and post.
After posting, double-check playback in the mobile app to make sure the clip did not lose quality. If the “+” icon fails to appear, clear your browser cache, toggle the device toolbar again, and reload.
3. Publishing Through Meta Business Suite
Meta Business Suite gives social media managers a free, browser-based dashboard that covers both Facebook and Instagram. Once your Instagram is converted to a Business or Creator profile and linked to a Facebook Page, Business Suite unlocks a Planner calendar where Stories can be created, previewed, and even scheduled days in advance.
The composer supports photo and video uploads, simple cropping, font overlays, mentions, and location stickers.
At the scheduled time the Story publishes automatically, so no phone confirmation is needed. What you do not get yet are music tracks, interactive polls, or swipe-up link stickers, those still require the mobile app. Even so, many teams choose Business Suite because everything, from drafts to performance data, lives in one place and can be shared with colleagues for approval.
Key features
- Supports: Photo and video uploads, simple cropping, font overlays, mentions, and location stickers.
- Automatic Publishing: Stories publish automatically at the scheduled time (no phone confirmation needed).
- Limitations: Does not yet support music tracks, interactive polls, or swipe-up link stickers.
How to post a Story via Meta Business Suite
-
Visit business.facebook.com and pick your Page.
-
In the left menu, open Planner and click Create Story.
-
Drag in your photo or video, crop or add basic text.
-
Select Publish now or set a date and time, then save.
After the Story is live, Business Suite tracks reach, taps forward, and exits. You can export these numbers as a CSV, making end-of-week reporting painless. If the Create Story button is missing, first confirm that your Instagram profile type is set to Business or Creator and that account permissions for the Page have not been revoked.
4. Running Instagram Inside an Emulator
Desktop power users who need every sticker, font, filter, and music cue often turn to an Android emulator such as BlueStacks or the built-in Android Subsystem in Windows 11.
An emulator creates a virtual Android phone on your PC, so you install the genuine Instagram mobile app from Google Play and run it with a mouse or touchpad. Because it is the real app, nothing is stripped away: you can layer music, drop interactive polls, add link stickers, and chain multiple Story panels together.
The trade-off is heavier resource use. The desktop version of emulators can eat several gigabytes of RAM and require hardware virtualization enabled in BIOS.
Some company security policies block them, so always confirm with IT before installing. If you have a modern processor and enough memory, though, an emulator delivers the same creative freedom you enjoy on your phone while keeping files, fonts, and brand assets within easy reach on your desktop.
Key Features:
- Allows you to install and run the genuine Instagram mobile app.
- Gives you access to all native tools: music, AR filters, interactive polls, link stickers, etc.
Trade-offs
- Requires heavier resource use (RAM and CPU).
- May require hardware virtualization enabled in BIOS.
- Security policies in some companies may block their use.
How to post a Story via an Emulator
-
Download and install BlueStacks 5, or enable Windows Subsystem for Android in Windows 11 settings, then sign in to Google Play.
-
Search for Instagram, click Install, and open the app.
-
Tap Your Story, choose a photo or video from your computer’s file picker, edit with any native tool: music, AR filters, polls and press Share.
For smoother playback inside the emulator, set the graphic mode to “compatibility” in BlueStacks settings and allocate at least four CPU cores and four gigabytes of RAM. If uploads stall at “Processing,” lower the video bitrate below 25 Mb/s or switch the export format to MP4 (H.264). Finally, remember that Instagram sessions inside an emulator count toward your account’s device limit, so log out when you are done to avoid verification prompts on your phone.
Benefits of Scheduling Instagram Stories From a Desktop
Using these desktop methods provides several significant advantages for managing your social media:
- Time Savings: Get Ahead by preparing everything in advance, reducing the need to be on your phone all the time.
- Higher Quality: Creating content on your computer allows you to use advanced editing tools for a higher quality post.
- Consistency: Scheduling helps you maintain a regular posting schedule, which keeps your audience engaged.
- Better Timing: Planning your Stories means you can choose the best time to share for the most reach and engagement.
Although Instagram doesn’t allow direct scheduling for Stories from the Instagram website, using Agorapulse makes it possible. This simple workaround helps you manage your social media more efficiently and ensures that your Stories are high-quality and well-timed.
Try Agorapulse for free and see how easy it is to manage your Instagram Stories and other social media posts. Schedule, track, and measure all your social media efforts with ease.
– – – –
Explore this content with AI:


